Alright, hands up – how many of you do regular backups? Be honest now.
I realize that it’s hard to get excited about this sort of thing. Backing up your computer’s files is not the sexiest thing in the world.
There aren’t even any good pictures to go with it.
For most of my clients, computers are not even a huge thing in their lives. Email, web browsing, and the occasional picture. That’s about it.
When computers go bad, there may be more at stake.
Banking and tax documents, passwords, contact lists, shopping receipts, as well as personal photos, music, videos, internet bookmarks … the list goes on.
Sometimes you don’t even think of what you have on your computer until it crashes. That’s when you wish you’d made a backup.
Unfortunately it’s one of those things you have to experience to truly appreciate. May it never happen to you.
You have to decide what your computer files are worth to you. If your computer was lost, stolen, or damaged beyond repair, would you pay $50 to get all your pictures and documents back? That’s about what most professional backup software costs.
Both Windows and Mac computers come with their own backup utilities (the Mac being superior by far), but they’re not the greatest. And you need a working Windows or Mac computer to get at them.
So, let’s agree that we’re going to make a backup and get going.
There are so many ways to do a backup that I’m going to keep it as simple as I can.
First, what you need:
You need something OUTSIDE your computer to back up to.
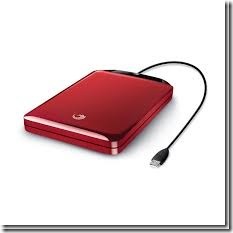
1. An external hard drive
2. Blank DVDs or CDs
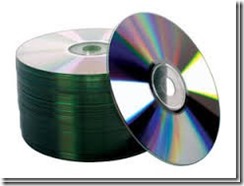
This is as close as it gets to permanent. DVDs can’t be erased by magnets like hard drives can.
The disks normally hold 4.7 Gigabytes’ worth of data unless you buy the “dual-layer” kind which will hold up to 8 Gb.
I use these for backing up stuff I couldn’t possibly face losing. That’s personal, financial, legal kinds of documents. Personal doesn’t just mean love letters, it also includes any of my journaling, creative writing, and website work. Maybe some love letters.
I don’t use DVDs for my music, pictures or videos. They just can’t hold enough.
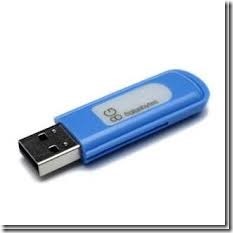
3. a USB Flash Drive, (also known as “ Memory Sticks”, “USB sticks”, “Thumbdrives”
One of these flash drives may be big enough to hold the files in your “Documents” folder or all of your absolutely-must-save files but I wouldn’t bet on saving all your big Picture, Music, and Video collections on one. For that, you should really get the external hard drive.
Another thing to keep in mind is that these things get lost easily. They get used for other things easily. If you are using flash drives for your backup, please remember to keep them in a secure place.
4. A “cloud” account: an “online” server
First, you know that there’s no such thing as The Cloud, right? That’s marketing talk for “someone else’s server”.
I’m not a big fan of “The Cloud”. For some people it is a great solution – especially if they are travelling or working away from home a lot and they need access to their documents. Personally, I don’t like having my files on someone else’s server but you can make up your own mind whether this kind of backup is for you.
I should say that I’ve been known to upload some files on a temporary basis to a “cloud” server, but only if I know I can’t get at them any other way. And I always go back and delete them when I’m through. That is, if you believe you can ever delete something from the Internet.
But I digress. Ahem.
Methods for Backing Up Your Computer:
1. The Built-in Windows Backup Utilities
2. The Built-in Mac Backup Utility
2. Free backup apps
3. Paid backup programs
4. The “Manual” backup
5. The “Cloud” – Dropbox, Microsoft OneDrive (formerly SkyDrive, Apple iCloud, Google Drive and numerous others.
1. The Built-In Windows Utilities
Windows 7 and, to some degree, Windows 8 have built-in backup utilities. Windows 7’s is called Backup and Restore.
Windows 8’s is called File History.
Naturally, if you’ve got Windows, these aren’t going to cost you anything extra and that is their main appeal.
Finding them and using them is another matter. Let’s take Windows 7 first.
I will do a complete walk-through of the Windows 7 Backup and Restore program because Windows 7 is what most of clients have.
The only other method I’ll do a blow by blow guide on is the Manual Backup. I’ll give good links to tutorials on the others.
Windows 7 Backup and Restore
1. Make sure your external hard drive is plugged in.
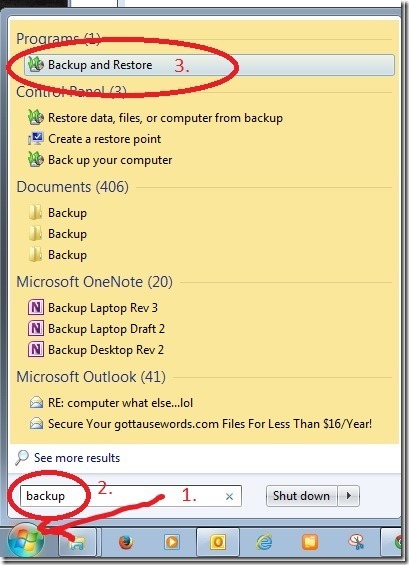
2. Click on your Start Button and type in “Backup” (no quotes)
3. Select “Back Up and Restore”
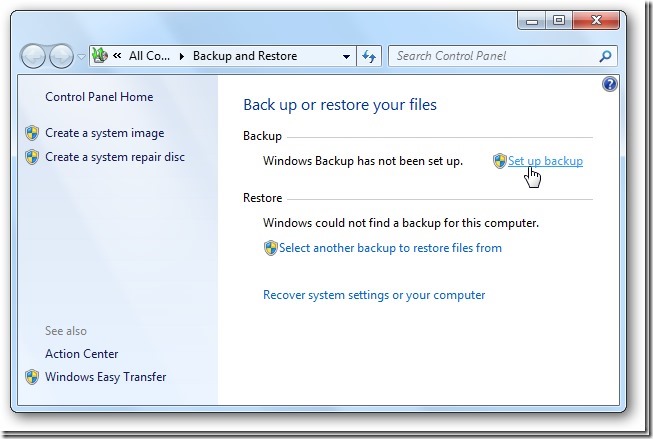
Click on “Set up backup”.
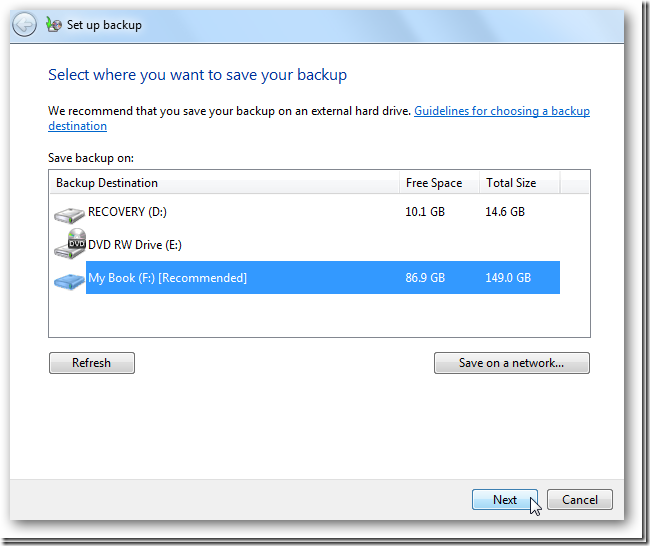
In the next figure, Windows will search for a suitable drive to store the backup:
Select your backup drive, and click Next.
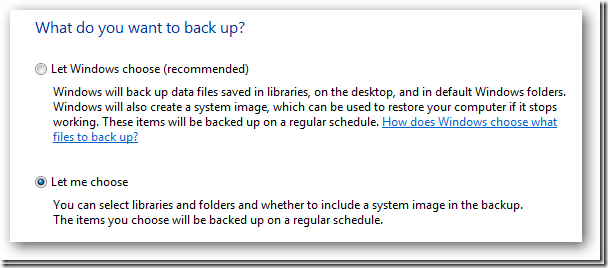
This is the next thing you’ll see:
You can have Windows choose what to backup or you can choose the files and directories yourself. I like to be able to pick what I want backed up, so I select “Let me choose”.
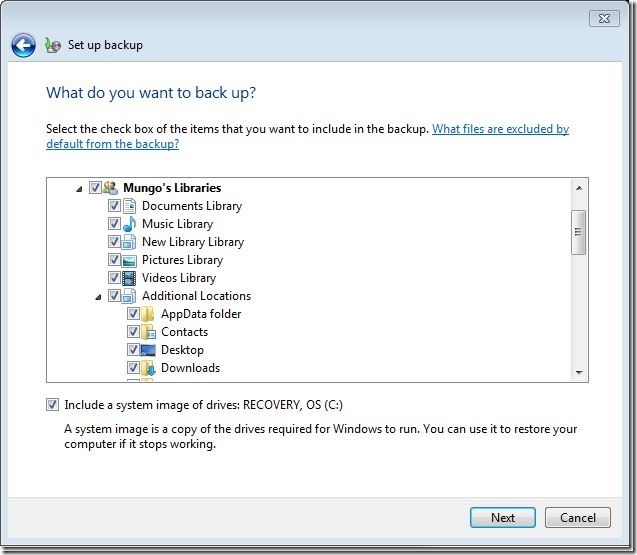
You can see above that I’ve chosen to back up EVERYTHING in my “Libraries”.
You will also see a check mark beside “Include a system image of drives:…”. This backs up more than just your personal files. This will make a copy of your Windows operating system, all your programs, and user accounts. It is recommended to check this box, especially if you don’t have an original Windows disk or if you have not made “System Recovery DVDs”. If your computer suddenly stops working or if the operating system gets corrupted beyond repair, you can restore everything back to normal with this option.
The only downside to checking this box is that your backup will take a long time. Well over an hour in most cases.
By the way, I don’t consider making a “system image” to be a substitute for having System Recovery Disks. These are usually made when your computer is new and being set up for the first time. Neither Windows or Mac computers come with an original installation CD or DVD anymore, so it’s imperative you make these disks.
If you already have a Windows installation DVD or have made System Recovery disks, you may opt for just backing up your data files.
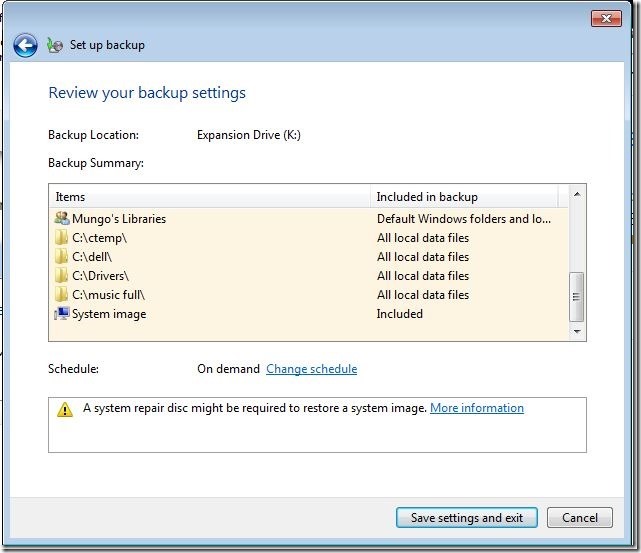
Click Next and you get to review your choices:
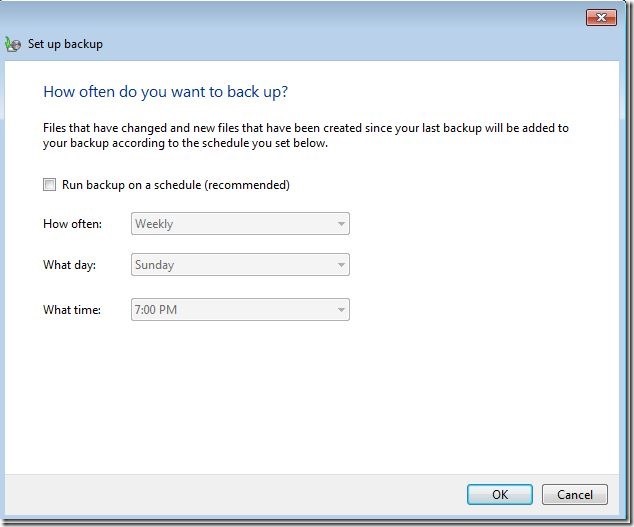
You can also change the schedule for your back up by clicking on “Change Schedule”:
I don’t do automatic backups, myself. I don’t like that my external hard drive always has to be connected. Sometimes, I like to use it for something else and an external hard drive that is connected to your PC can get hit by the same power damage or malware as your internal hard drive. I only connect it when I need to.
Once you’ve done the scheduling (or not), click OK. You’ll go back to the previous screen.
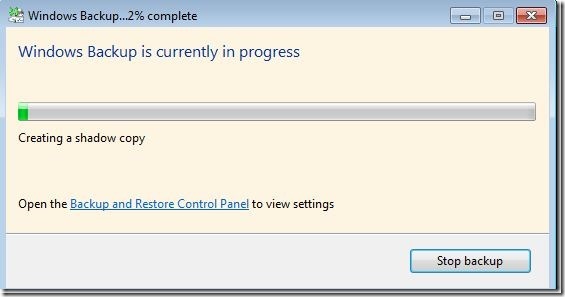
Now, click on “Save settings and exit” and your first backup will start.
Click the View Details button to see exactly what is being backup during the process.
And that’s it. Now you wait.
If you’d like to see a little video of how it all goes, Microsoft has one at:
http://windows.microsoft.com/en-us/windows/back-up-files#1TC=windows-7
NOTES:
This is the simplest way to do a backup on Windows 7.
Once you start the Backup and Restore program, you basically follow the instructions and pick what you want to back up.
There are a couple of things to be aware of, though, and I’ll mention them now.
The first time you do a backup with Backup and Restore, it will do a FULL backup. That means everything you’ve selected. Be prepared for it taking quite a while. It could take well over an hour. Be patient.
The next time you do a backup, the program makes what is called an INCREMENTAL backup. The program checks what’s new or been changed with your documents etc. and only backs up the new or altered stuff.
Sometimes, it’s happened that Backup and Restore will do a FULL backup every time you run the program.
You can tell if this is happening if you get a warning that there is not enough space on the external drive for a back up. Or, if your backup is taking an inordinate amount of time to complete – like, hours.
This seems to be a glitch. It happens rarely but you then have to make a choice whether to try to rectify the problem or go with a different backup solution.
Usually, you would use the “Manage Space” and “View Backups” option to clear out old backups. But there’s no guarantee it won’t keep making full backups. If it does, I recommend switching to one of the free backup programs I mention later.
Once more, this rarely happens but I say it here as a “heads up”.
The Built-In Windows 8 “File History”
Microsoft got rid of its Backup and Restore function with Windows 8. They want you to use their online service called OneDrive.
Instead, they put in something called File History. I can’t really recommend it and I can’t improve on the following tutorial by the “How To Geeks” people.
http://www.howtogeek.com/74623/how-to-use-the-new-file-history-feature-in-windows-8/
If you want to follow Microsoft’s own video on how to use File History, here is the official link:
http://windows.microsoft.com/en-ca/windows-8/how-use-file-history
2. The Built-in Mac Backup Utility – “Time Machine”
This is certainly one time you can believe Apple’s old slogan: It Just Works.
The icon for starting Time Machine is right there on your Dock at the bottom of your Mac screen.
There are people who have spent a lot more time than me making this stuff simple. Here’s a link I recommend:
http://www.cultofmac.com/46726/how-to-backup-and-restore-your-mac-using-time-machine-macrx/
And here is the office Apple way:
http://support.apple.com/kb/ht1427
See, it just works. Saved me some time, that’s for sure.
4. The Manual Backup
Because this is known as “The Hard Way”, I’ve provided a little music link to Chet Baker’s version of the song by the same name.
It helps the medicine go down (no link to that one – sorry).
Windows (all versions)
It doesn’t get mentioned much but this is the good old fashioned method. Basically you copy and paste folders and files from one location to another. It’s not automatic and it does require some basic Windows skills. It has some good things going for it, though. You get an exact duplicate of the folder you want to back up, without needing any other program to open it or check it’s contents.
Pros:
It works with every kind of computer.
No new software to buy or learn.
No compression or funny archived files that you need a special program for.
You get an exact copy that you can easily transfer and open.
Cons:
You need to pay attention.
It takes some explaining to do it the first time.
You need to have basic Windows skills (which are not so basic for some folks).
Copying can take a long time while you want to do something else with your computer.
It can be hard to keep track of newest files, especially if you’ve got more than one computer.
Takes up more storage space than compressed backups.
There are two basic ways to do a Manual Backup:
1. The simple way with Windows Explorer (File Explorer in Windows 8) opened once, and:
2. The “two-pane” Windows Explorer method. I prefer this method myself because I can see more.
I can see the folders on my hard drive and I can see where it’s going on the external drive, and if it got there.
Here is a checklist of important folders to back up:
- My Documents or Documents
- My Music or Music
- My Pictures or Pictures
- My Videos or Videos
- Desktop Folders (you may wish to re-file these to an appropriate folder, like Documents, just to keep all similar kinds of files in one place.)
- Contacts
- Links, Bookmarks,
- Downloads
- Favorites (keep the American spelling)
- Saved Games
- Searches
- Any other folders you’ve created yourself
Backing up your Email will vary depending on what program you use. If you use any of the webmail services, your mail is already stored on the Internet. You can, however, save any attachments and individual messages to your own computer. There are so many variables involved in backing up your email that I’m not going to get too far into it here. One good thing about using a program like Microsoft Outlook, Mac Mail, among others, is that it stores all your email, contacts, calendar items in a folder in My Documents. So just backing up your Documents folder will do the trick. For older versions of Outlook (before 2007) and Outlook Express (for die-hard Win XP users), it’s much trickier. Here are a couple of links that can help you:
Find your Outlook and Windows Mail
Find your Windows Mail and Data
Backing up webmail, like Yahoo Mail, Hotmail (now Outlook.com), Gmail and so on, can be a cumbersome affair. Aside from opening and saving each email message one by one, (every web browser does this differently), you could copy and paste the messages into a Word or text editor program and save them that way. It’s a pain.
It is highly recommended, though, that you save your contacts, important messages and attachments to your hard drive for safe keeping. Or, good heavens(!), write those contacts in a notebook.
1. The Simple “One-Pane” Windows Explorer Method
1. Plug in your USB or external hard drive
2. Open Windows Explorer – press the Windows key and “E”.
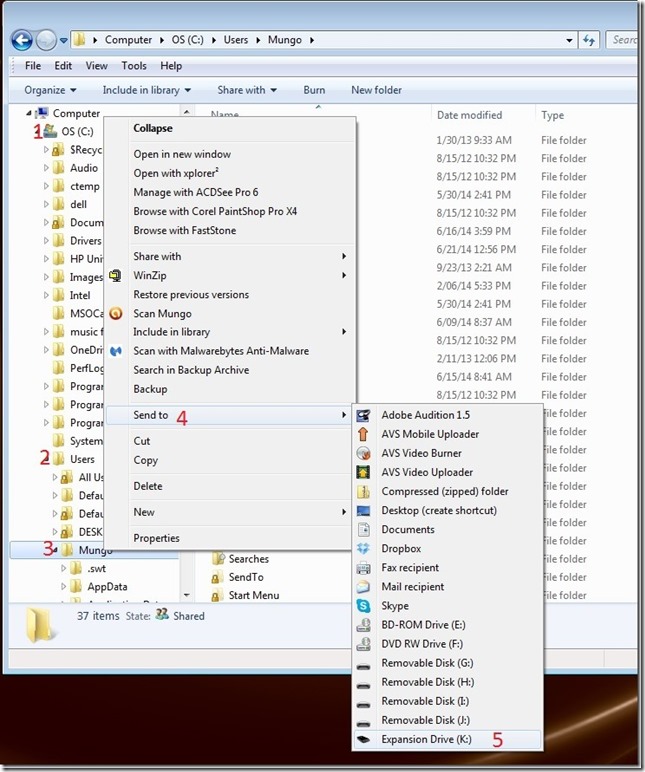
3. Select (C:) > Users > [yourusername] and expand it.
(You should now see all your user folders (Contacts, Desktop, Downloads, etc)
4. Starting at the top of the list, right-click on the first folder
5. Mouse-over the Send to: menu item
6. Click on the USB or external hard drive from the list. In the picture below, the drive I want to pick is “Expansion Drive (K:).
That’s the name of my external drive.
7. Windows will now copy the selected folder and it’s contents to your backup drive.
8. Repeat this process for each folder. Be prepared for it to take some time.
Note: The above method will not let you choose a destination folder, only the drive. So, when you “Send” a folder to your backup drive, i.e. your Documents folder, it may send a whole lot more than you’d like (such as Music, Picture, and Video folders). You may want to check the contents of your folder for huge or unwanted files first.
2. The “two-pane” Windows Explorer method
This is the method I use.
1. Open up two copies of Windows Explorer (File Explorer in Windows 8)
In Windows 7:
2. Open Windows Explorer – press the Windows key and “E”.
Do it again.
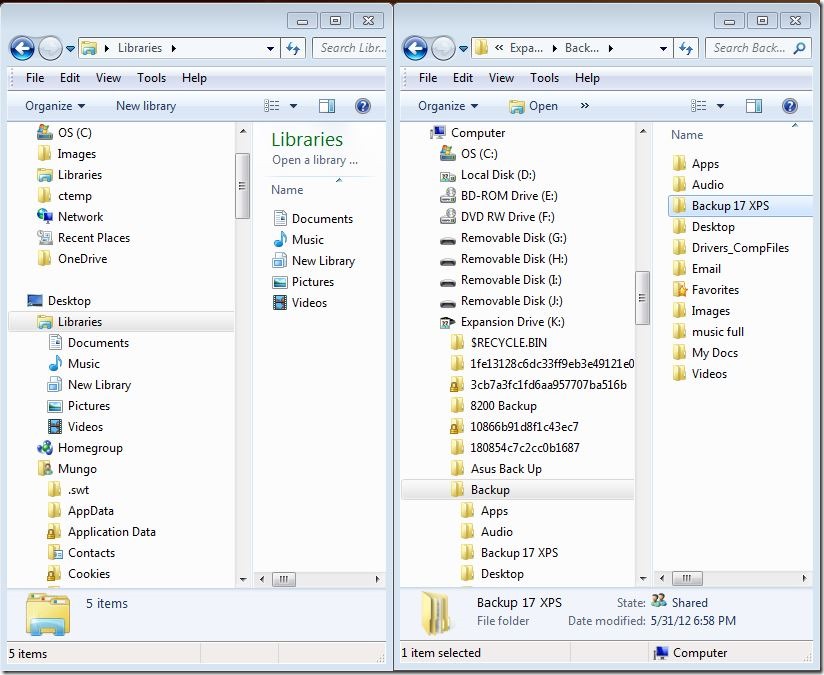
Now, move the windows beside each other so they look something like this:
You can resize and move these windows around any way you like. I’m showing what’s on my C drive on the left (the “source” drive) and, on the right, is my “destination” drive, in this case an external USB drive that I’ve plugged into my computer.
Now, it’s a matter of copying over your folders from the left side to the right. The two easiest methods are
1. Copy and Paste (not Cut and Paste)
Simply right-click on the icon for the folder you want to copy, and select “Copy”. Who knew?
Now, mouse you mouse pointer over to the place on the right where you want to copy the folder, right-click, and select “Paste”.
2. Drag and drop
Here, you select the folder you want to copy and left-click on it. While holding down the left button, drag it over to the place on the right side window and release the button.
If all that is too much, you can invest in third party applications like xplorer² or teracopy.
3. Free backup apps
Keep in mind you often get what you pay for. These programs will do the job but may come with advertising or without all the options of the full “paid” product.
For Windows, I’ve used:
For the Mac, I haven’t been able to find any good free programs. There are paid programs that have 30 day trials but what are you going to do after a month? Either use Time Machine or get a commercial backup program like Carbon Copy Cloner.
4. Paid Backup Programs
For Windows:
I’ve used Acronis for years and is my first choice for a commercial backup product.
Colleagues of mine also recommend
2. NovaBACKUP
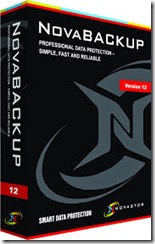
There is no shortage of other choices out there. Just make sure you Google around for reviews about their reputation.
For the Mac:
I love this program. I used to love it more when it was totally free! Now you can use it for 30 days to see if it’s for you. Personally, I think it’s worth it.
2. Acronis also makes a good backup program for the Mac.
5. The “Cloud”
Does this look like a cloud to you?

It’s actually one of Facebook’s massive server farms. There’s nothing magical or atmospheric about the “Cloud”. What it really is a network of huge rooms full of computer servers.
I’m not going to spend a lot of time on Cloud (online) backups. I simply can’t put my trust in any of them. Not one of them will guarantee the safety of your data. Here’s an example from Dropbox:
“You, and not Dropbox, are responsible for maintaining and protecting all of your stuff. Dropbox will not be liable for any loss or corruption of your stuff, or for any costs or expenses associated with backing up or restoring any of your stuff.”
Pros and Cons of Cloud Backups
Pros:
Access from anywhere.
It’s a relatively cheap “offsite” backup (as opposed to a bank vault or the trunk of your car).
Cons:
You have to be on the internet and have a fast connection.
Unless you’ve got a small amount to back up, they cost.
Backing up and accessing files can quickly exceed the limit on your Internet plan. Every backup is data transfer.
System Restores do not work so well from the Cloud.
The “trust” issue. Accounts can be hacked and spied upon.
Cloud companies can go under or be sold, renamed, changed – it’s all out of your control.
Like I said, I’m not going into great detail on how to back up your data to the Cloud in this post.
If you think it might be for you, Google any of the above services and they will be happy to instruct you.
——————————–
The Off-Site Backup
At the risk of overwhelming everyone, I have to talk about the “Offsite Backup”
There is a thing called the Golden Rule of Backing up It goes like this:
1. Backup to three different places.
2. At least two of the backup locations need to be on different media.
3. One of the locations needs to be offsite.
So far, we’ve made a backup to an external hard drive (Rule One) and we’ve saved the really important stuff to DVDs (Rule Two).
The “Offsite Backup” is taking at least one of those backups to a place other than your house or apartment. And that’s Rule Three.
Some inexpensive places could be a friend’s house, the trunk of your car, your workplace. You might opt for the free online version of Microsoft’s OneDrive or Apple’s iCloud. You get a few Gigabytes of storage that way, but with the caveats I’ve mentioned before.
Anyway, I’ve fulfilled my obligation to talk about this extra security measure.
You don’t miss your water till the well runs dry
Someone did a song with those lyrics. And Joni Mitchell sang:
“Don’t it always seem to go
You don’t know what you’ve got ’til it’s gone”
That, in essence, is what I’ve been trying to get across in this post. Computers crash, files get deleted, stuff happens.
A backup can put it all right again, without pain. So why don’t you prevent the headache now and, for Pete’s sake, back it up.
Whew!
I think we all deserve some soothing music after all that. Please enjoy:









Thanks and thanks for my interlude with Oscar.
Most welcome! That cat could play!